Rebar Schedule Placements
To open Rebar Schedule Placements :
▸ Home > Project Settings > Fabricator > Rebar > Rebar Schedule Placements .
Password protection: If a password has been set using the Change Setup Password utility, you can open this window only if you first enter that exact password.
Access control: Job and fab setup (can be set on a per-project basis).
Adding / Editing / Erasing / Reviewing :
|
The Rebar Schedule Placements window is a Fabricator Option . It affects automatic detailing.
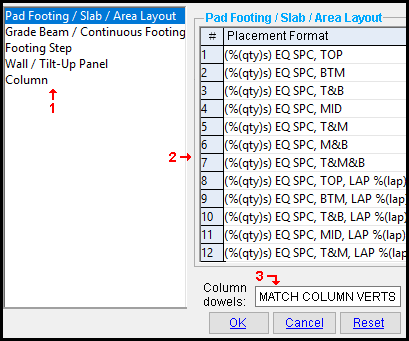
1 . In the tree, select ' Pad Footing ... ' or 'Continuous Footing ...; to get the " Placement Format " list that you want to review or edit.
2 . Make changes to the " Placement Format " list items as needed.
3 . Make changes to any placement format options as needed.
Each placement format list item or option contains a character string . Optionally, the string can contain one or more allowed format variables .
The entries you make to these placement list items and options format " Placement note " fields for rebar shape material when the member in which the rebar is placed undergoes Process and Create Solids . The placement note can also appear in reports made with Report Writer and in custom reports .
Format variables :
Placement format entries may include format variables . All format variables take the form %( mapping key )s , where the mapping key signifies an attribute of the rebar. These attributes are the entries made to custom component options, entries made to template options, and quantities and spacings that are generated by the system when it places rebar.
Not all format variables are valid for each placement format list item or option. Depending on the list item or option, the following placement format variables may be used:
format variable rebar attribute %(qty)s quantity %(spacing)s spacing %(usage)s usage %(lap)s lap %(size)s size For detailed examples of how format variables are mapped to placement notes, see here .
Also see :
- Modeling (where reinforcing bar is added)
- Custom components (a source of attributes that are mapped to format variables)
- Rebar System (a source of attributes that are mapped to format variables for concrete walls and footings)
- Rebar Shape Material edit window (where placement notes appear)
- Custom Report (creates rebar reports in which placement notes can appear)
Options :
|
Changes made to these placement categories are applied to your current Fabricator . Each Fabricator in your current Job has a different set of Placement Formats . |
|
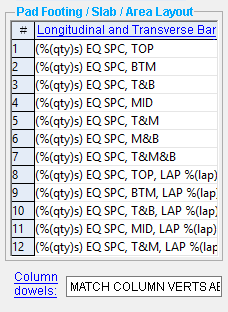 |
------ Pad Footing / Slab / Area Layout ------
Each entry to a placement format list item or option accepts a character string . Optionally, the string can contain one or more allowed format variables . These entries are applied when the system designs Pad Footing or Concrete Slab .
Longitudinal and Transverse Bar: Placement formats are mapped when the system designs a Rebar System custom component.
Allowed format variables: %(qty)s, %(spacing)s, %(usage)s, and %(lap)s
Example: You add a rebar system custom component to a concrete slab. You specify three mats, with layers each way and ' 1-0 ' as the " Distance between rebar " on all layers.
The string ' @ %(spacing)s T&M&B ' is entered on line 28. When the system designs a reinforcing bar in the rebar system, the placement format from this line of the table is applied to the placement note because the rebar system has top, middle, and bottom layers with equidistant spacing.
The entry for " Distance between rebar " is mapped to %(spacing)s and the bar's Placement note is auto-populated with the string "@ 1-0 T&M&B."
Column dowels: Placement formats are mapped when the system designs a Column Dowel custom component, and are applied to the dowel's Placement note .
%(qty)s is mapped when the system designs the dowels and determines the quantity of the bars from the Vertical bar pattern ( Perimeter or Circle ) concrete column template item .
%(lap)s is mapped from the choice made to the Lap option.
|
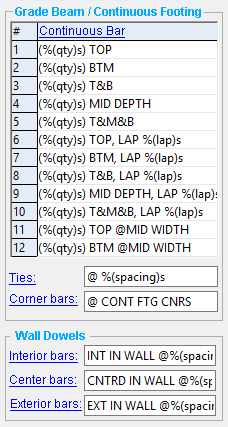 |
------ Grade Beam / Continuous Footing ------
Each entry to a placement format list item or option accepts a character string . Optionally, the string can contain one or more allowed format variables . These entries are applied when the system designs a Grade beam or a Continuous Footing .
Format variables are mapped to settings to template items in the grade beam template or to items in the continuous footing template , and are applied to the rebar's Placement note .
Continuous bar: Placement formats are mapped from settings to the Continuous bar pattern (Grid) of a grade beam template, or settings to the Cont bar pattern (Grid) of a continuous footing template.
Allowed format variables: %(qty)s , %(usage)s , and %(lap)s
Example: You add a grade beam member. You edit its template and add a Continuous bar pattern (Grid) template item. The bar's size designation is #6, and you have three rows of bar (top, middle, and bottom).
The string ' (%(qty)s) T&M&B, LAP %(lap)s ' is entered on line 10 of the table. When the system designs a reinforcing bar for the grade beam, the placement format from this line of the table is applied to the placement note because the rebar system has top, middle, and bottom layers.
The entry for " # columns " is mapped to %(spacing)s . The " Horz. in concrete " lap length entry for #6 bar (in this case, ' 4-0 ') is mapped to %(lap)s . The bar's Placement note is auto-populated with the string "(3) T&B, LAP 4-0."
Ties: Placement formats are mapped from settings to the Tie definition of a grade beam template, or settings to the Tie definition of a continuous footing template.
%(usage)s is mapped from the choice made to the " Function " option of a grade beam, or the " Function " option of a continuous footing.
%(spacings)s is mapped from the choice made to the " Spacing " option of a grade beam, or the " Function " option of a continuous footing.
Corner bars: This placement format option is applied when the system designs the corner rebar of a grade beam or continuous footing.
------ Wall Dowels ------
Each entry to a placement format option accepts a character string . Optionally, the string can contain one or more allowed format variables . These entries are applied when the system designs a Wall Dowel custom component.
Interior bars: This placement format option is applied when the system designs a Wall Dowel custom component with an ' Inside ' " Placement ."
%(spacing)s is mapped from the choice made to the Distance between dowels option in the Wall Dowel edit window.
%(lap)s is mapped from the choice made to the Lap option.
Center bars: This placement format option is applied when the system designs a Wall Dowel custom component with a ' Center ' " Placement ."
%(spacing)s is mapped from the choice made to the Distance between dowels option in the Wall Dowel edit window.
%(lap)s is mapped from the choice made to the Lap option.
Exterior bars: This placement format option is applied when the system designs a Wall Dowel custom component with an ' Outside ' " Placement ."
%(spacing)s is mapped from the choice made to the Distance between dowels option in the Wall Dowel edit window.
%(lap)s is mapped from the choice made to the Lap option.
|
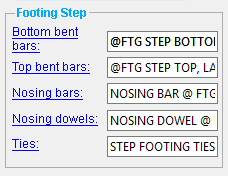 |
------ Footing Step ------
Each entry to a placement format option accepts a character string . Optionally, the string can contain one or more allowed format variables . These entries are applied when the system designs a Grade beam or a Continuous Footing .
Placement formats are mapped from settings to template items in the footing step template and applied to footing step rebar placement notes.
%(qty)s and %(lap)s are mapped when the system designs the footing step and determines the location and quantity of the bars.
%(usage)s is mapped from the choice made to the Step bar (Bottom) template item.
%(qty)s and %(lap)s are mapped when the system designs the footing step and determines the location and quantity of the bars.
%(usage)s is mapped from the choice made to the Step bar (Top) template item.
%(qty)s is mapped when the system designs the footing step and determines the quantity of the bars.
%(usage)s is mapped from the choice made to the " Function " option in the Nosing bar template item.
%(qty)s is mapped when the system designs the footing step and determines the quantity of the bars.
%(usage)s is mapped from the choice made to the " Function " option to the Step bar (Independent) template item.
Ties: %(qty)s and %(spacing)s are mapped when the system designs the footing step and determines the location and quantity of the bars.
|
 |
Each entry to a placement format option accepts a character string . Optionally, the string can contain one or more allowed format variables .
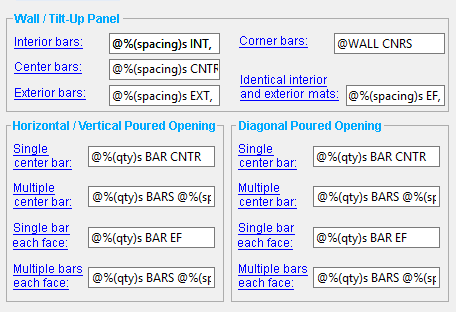
------ Wall / Tilt-Up Panel ------
These entries are applied when the system designs a Rebar System custom component, or a Tilt-Up Panel Reinforcement custom component.
Interior Bars: %(spacings)s and %(lap)s are mapped when the system designs the " Inside mat " of a Rebar System custom component, or the " Interior mat " of a Tilt-Up Panel Reinforcement custom component.
Center Bars: %(spacings)s and %(lap)s are mapped when the system designs the " Center mat " of a Rebar System custom component, or the " Center mat " of a Tilt-Up Panel Reinforcement custom component.
Exterior Bars: %(spacings)s and %(lap)s are mapped when the system designs the " Outside mat " of a Rebar System custom component, or the " Exterior mat " of a Tilt-Up Panel Reinforcement custom component.
Corner Bars: This placement format option is applied when the system designs the " Corner rebar " of a Rebar System custom component.
Identical interior and exterior bars:
------ Horizontal / Vertical Poured Opening ------
Placement formats are mapped when the system designs a Concrete Wall Opening custom component, and are applied to the placement notes of the horizontal and vertical rebar that is placed around the edges of the opening.
Allowed format variables : %(qty)s , and %(spacing)s (when the " Number of bars " of rebar is ' 2 ' or greater).
Single center bar: This placement format option applies when the system designs a single bar in a single layer in the center of the wall; that is, when the " Number of bars " of rebar is ' 1 ' and the number of " Rebar Layers " is ' 1 '.
Multiple center bars: This placement format option applies when the system designs a single bar in a single layer in the center of the wall; that is, when the " Number of bars " of rebar is ' 2 ' or greater and the number of " Rebar Layers " is ' 1 '.
Single bar each face: This placement format option applies when the system designs a single bar in a single layer in the center of the wall; that is, when the " Number of bars " of rebar is ' 1 ' and the number of " Rebar Layers " is ' 2 ' or greater.
Multiple bars each face: This placement format option applies when the system designs a single bar in a single layer in the center of the wall; that is, when the " Number of bars " of rebar is ' 2 ' or greater and the number of " Rebar Layers " is ' 2 ' or greater.
------ Diagonal Poured Opening ------
Placement formats are mapped when the system designs a Concrete Wall Opening custom component, and are applied to the placement notes of the diagonal rebar that is placed at the corners of the opening.
Options in this section are identical to options in the Horizontal / Vertical Poured Opening section.
|
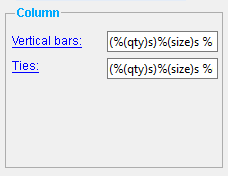 |
------ Column ------
Each entry to a placement format option accepts a character string . Optionally, the string can contain one or more allowed format variables . These entries are applied when the system designs Concrete Column or Cast In Place Column .
Vertical bars : Format variables are mapped to settings to in the concrete column template , and are applied to the rebar's Placement note .
Allowed format variables : %(qty)s , %(size)s , and %(usage)s
Example: The entry made to this field is (%(qty)s)%(size)s %(usage)s .
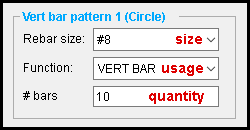
A circular vertical bar pattern item is added to a concrete column template with the settings shown.

A cast in place column is modeled, and the column template edited above is selected in the Cast In Place Column edit window.
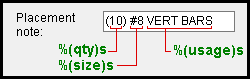
The format variables are mapped to the settings above, and the rebar shape material " Placement note " is auto-populated.
%(size)s , %(usage)s and %(spacings)s are mapped from settings to the Tie Zone custom component, or from settings to template items in the concrete column template .
%(qty)s is mapped when the system designs the tie zone and determines the quantity of ties.
Example: The entry made to this field is (%(qty)s)%(size)s %(usage)s@%(spacing)s .
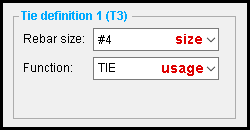
A tie definition template item is added to a concrete column template with the settings shown.
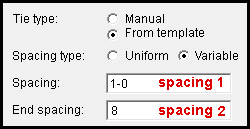
A Tie Zone custom component is added to a concrete column. Variable spacing is selected.
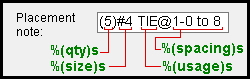
Three of the format variables are mapped to the settings above, and the rebar shape material " Placement note " is auto-populated.
In the example above, %(size)s is mapped from the setting made to the " Rebar size " option in the concrete column template. If the Tie Zone " Tie type " was set to ' Manual ', the usage would be mapped from the selection made to the Tie Zone " Size " option instead.
To close Rebar Schedule Placements :
![]()
![]()
![]()
"OK" (or the Enter key) closes the Rebar Schedule Placements window and saves its contents to the current Fabricator . Settings on this window will be applied only so long as that Fabricator remains your current Fabricator. To change to a different Fabricator , Home > press "fabname" > double-click the Fabricator you want.
Note: If you want changes to this window applied to rebar shape material in members that have already undergone Process and Create Solids , you can Process Selected Members then Process and Create Solids . Or you can Mark Members for Processing then Process and Create Solids .
"Cancel" (or the Esc key or the
button) closes this window without saving any changes made to it.
"Reset" undoes all changes made to this window since you first opened it. The window remains open.

